White Ensign Model’s (WEM) photo etched sets.

Talk about your projects, exchange ideas, tips, colors, etc.
User avatar
Kit-Builder
Member
Posts: 86
Joined: Sun Nov 27, 2005 12:25 pm
Location: Western Australia

White Ensign Model’s (WEM) photo etched sets.

Post by Kit-Builder »

Some start off thoughts………

The lack of comprehensive instructions (you will need reference material to do this is written on the instruction sheets) is indicative of all PE/aftermarket manufacturers and this would be more a reluctance on their part to commit us on a course that could well end in a wrecked kit (you need to be sure of your own skills before you start cutting it up!).

Tip number one to using these types of sets is understand that you are (if you’re like me) NOT a world class model ship builder so compromises between skill and detailing will need to take place (be happy with your work). We can’t all be abnormal when it comes to the overall level of talent on display here and at other sites :D.

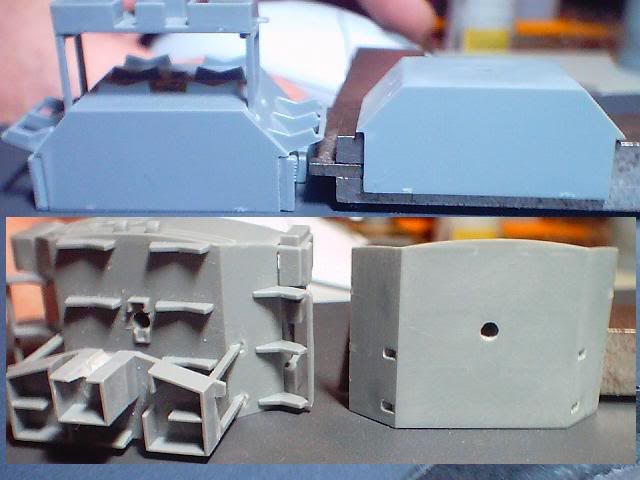
Ok I’ve looked at a few sites that have construction photos showing the set[s] in use BUT there is the lack of close up pics to help out or even details on the “tricky bits” like cutting the kits aircraft hanger up to fit the boat racks.

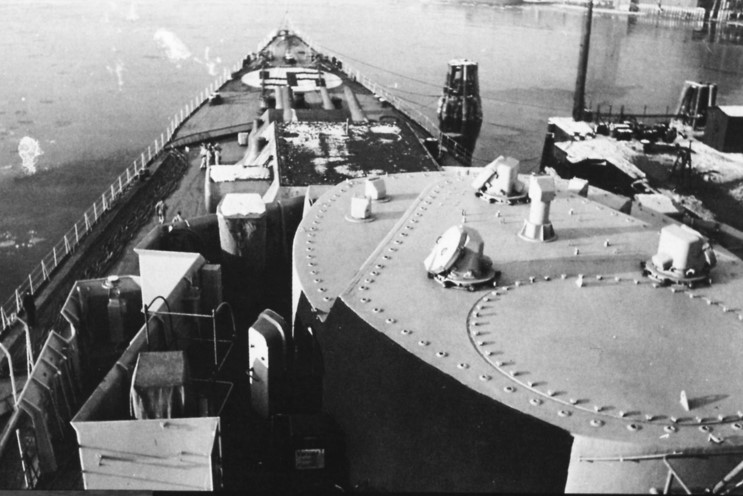
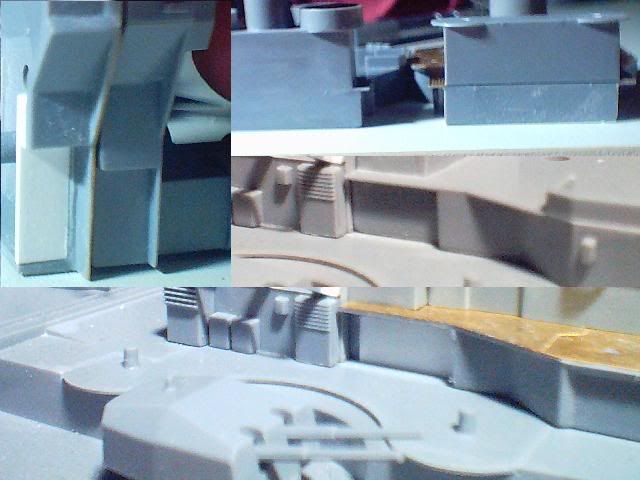
The rear superstructure decking seems to be a fraction undersize, width wise, and will need a bit of the “check twice, glue once” treatment. If anyone can add to this I would be in their det (as to other parts of the ship fitting).

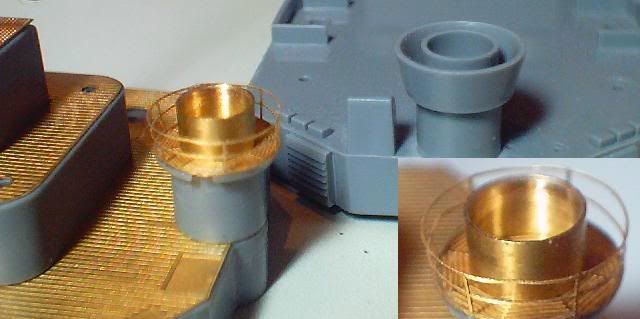
The two rear search-light bases/floors are well undersize or over if you want to slip them inside the “tubs” on the Tamiya Bismarck and if you are going to add railing then this is going to be a small visual problem.

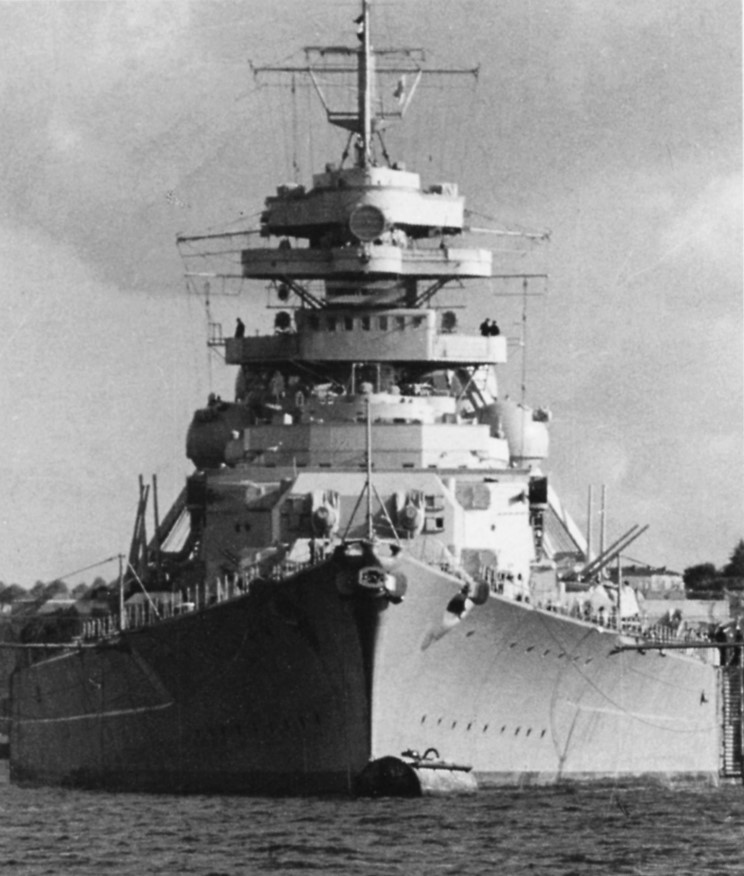
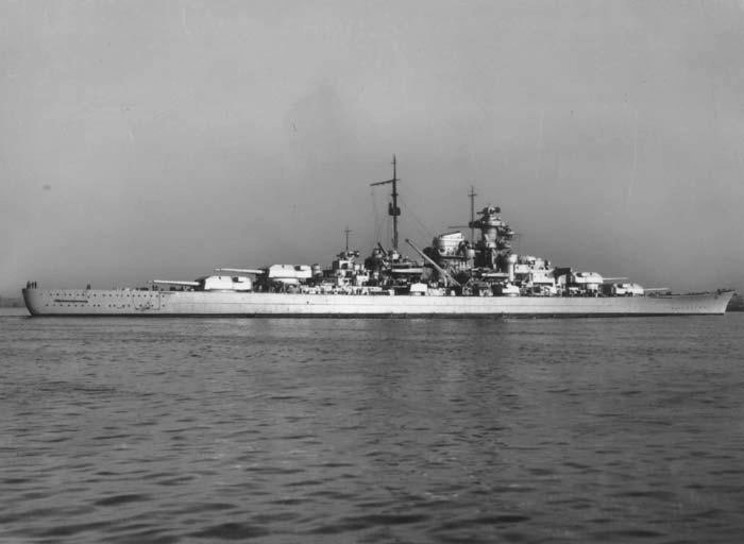
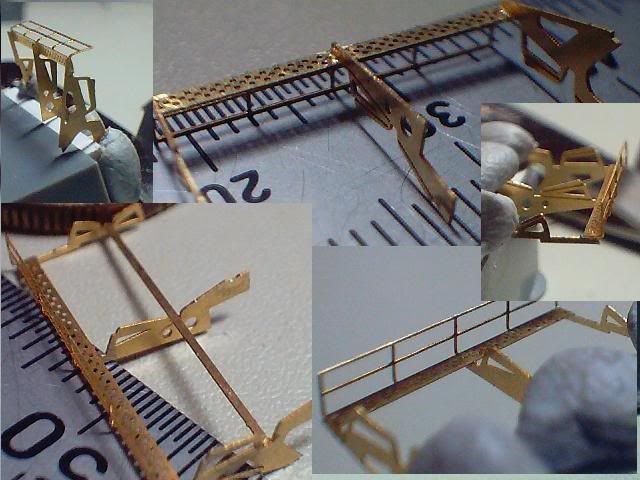
So that’s where I’m at, at this point in time (I'm also working up some brass masts and have started on the rear range finders one). The deck set it’s self is beautiful with some of the finest etching I have ever seen (from my 1/35 armour PE sets days) and do not for one second let my lack of talent put you off enhancing Tamiya’s “toy” with them.

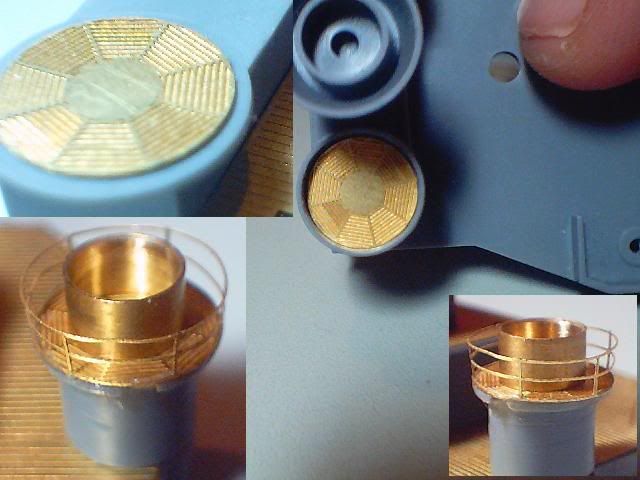
I’m going to link some progress pics along the way to show the tricky bits and how to get around them (I’ve already stuffed up with the splinter shielding around the back rangefinder housing) or repair them if I make a blunder.

Steve :shock:
User avatar
Antonio Bonomi
Senior Member
Posts: 3799
Joined: Mon Oct 18, 2004 10:44 am
Location: Vimercate ( Milano ) - Italy

PE sets for BS and TP

Post by Antonio Bonomi »

Ciao Steve and all,

I agree with you, of course if you want to use those PE sets a minimum level of medeler skill is required, because you are going to risk your model for sure by cutting it to fit the new pieces.

I have already worked with TOM's and GMM, not yet with WEM as I have just received 3 full sets but I still miss the decks that are on back order.

Anyway, I have to finish as said my X-Craft first so I plan to start during Christmas period with my new Tirpitz set as said, probably 5 all togheter.

Probably you have already seen some of my model photos around, if not I can send them to you easily, so do not worry you will have reference material.

Question : you are going to make the Bismarck, .. what day ??

So at least I start focusing on what you want to realize.

Ciao Antonio :D
User avatar
Kit-Builder
Member
Posts: 86
Joined: Sun Nov 27, 2005 12:25 pm
Location: Western Australia

Re: PE sets for BS and TP

Post by Kit-Builder »

Antonio Bonomi wrote: Question : you are going to make the Bismarck, .. what day ??

So at least I start focusing on what you want to realize.

Ciao Antonio :D
Hi Antonio,
I want to build the very latest all grey ship that I can (before the stripes and fake waves).
Areas that will help me most is what can not be seen behind the 150mm turrets (vents, doors and portholes). I can find almost nothing to help me out in these areas :lol:.
Regards from Perth,
Steve
User avatar
Kit-Builder
Member
Posts: 86
Joined: Sun Nov 27, 2005 12:25 pm
Location: Western Australia

Post by Kit-Builder »

Nothing to do with my build but it could be of use to some of you out there :idea:.
Here is some good news from WEM that they will not mind me posting.
I like paypal more than credit cards (just never feel safe handing out cash details to strangers) so I’m very happy with this news.
Regards Steve

Just a quick note for those interested:

White Ensign Models now accepts Paypal payments. Feel free to submit orders by e-mail, and we'll e-mail you the total amount to be remitted. Paypal contacts us that the payment is made, and your shipment is in the mail!

Cheers,
John Snyder
White Ensign Models
http://whiteensignmodels.com/
User avatar
Antonio Bonomi
Senior Member
Posts: 3799
Joined: Mon Oct 18, 2004 10:44 am
Location: Vimercate ( Milano ) - Italy

Bismarck model

Post by Antonio Bonomi »

Ciao Steve,

I see,.. so if you want to avoid the Baltic camouflage with black and white stripes you have only 2 options, make it as she was before the end of 1940 or after May 21st, 1941 going out of Grimstad Fjord as that camo was removed.

I choose this last option showing her on may 24th, 1941, .. you seems to be on the other option on 1940 status.

This will change some details on the ship like for example the light anti-aircraft guns layout that I have re-constructed for another website years ago ( for Bismarck as well as for the Tirpitz ) :

http://www.bismarck-class.dk/technicall ... marck.html

you will not read my name nor my copyright on the drawings, .. but the informations on the 20 mm flak evolutions were out of my knowledge and never published before by anybody :wink: .

Ciao Antonio :D
User avatar
Kit-Builder
Member
Posts: 86
Joined: Sun Nov 27, 2005 12:25 pm
Location: Western Australia

Post by Kit-Builder »

“Aaaaaaah, Houston we have a problem.” long pause “yes we get that on our screens too”.

Antonio, what have you done to me!
Ok there would seem to be a lot of time-frame Bismarcks.

1
Launch Bismarck = no rangefinder turrets, famous head on shot (all pics linked from http://www.maritimequest.com) freshly fitted out and about to undergo trials.
Image

2
Post trial Bismarck with 2 rangefinders, with the one over the wheelhouse/navigation bridge missing, seen in this most striking shot of him (I wish I could say that this is the most beautiful shot of her....... but she is a he :shock:). Bismarck still has local rangefinders on all turrets.
Image

3
The reason for me thinking that the last image is post trial is because of this shot below. Bismarck now has only 3 turrets with rangefinders but still only the 2 main turret ones. The one over the wheelhouse is yet to be fitted. Image

4
This is him as he is “historically” remembered but for a rank-amateur like me I would have built this one but painted the upper-hull/superstructure light grey.
Image

5
The last one that I don’t know if there is a shot of is the post “Korsfjord” Bismarck with all the air recognition marking and side striping painted over.

Any other major differences that I’ve missed? I think that possibly makes 5 clearly identifiable ships to build from (not that you can do that with a OOTB build from Tamiya, you can only do late ones).

So after all that, and I got the WEM AA set just for the 20mm quads, I think it will be #5 my hart was on #2 but my head will have to lead.

Thank you Antonio you have been very helpful :ok:.
Regards Steve
User avatar
Kit-Builder
Member
Posts: 86
Joined: Sun Nov 27, 2005 12:25 pm
Location: Western Australia

Re: Bismarck model

Post by Kit-Builder »

Antonio Bonomi wrote:Ciao Steve,

I
http://www.bismarck-class.dk/technicall ... marck.html

you will not read my name nor my copyright on the drawings, .. but the informations on the 20 mm flak evolutions were out of my knowledge and never published before by anybody :wink: .

Ciao Antonio :D
Sorry Antonio, I forgot to say how much liked your link :clap:. Thank you for the link (and we are now building the same ship!)
Steve
User avatar
Antonio Bonomi
Senior Member
Posts: 3799
Joined: Mon Oct 18, 2004 10:44 am
Location: Vimercate ( Milano ) - Italy

Bismarck model

Post by Antonio Bonomi »

Ciao Steve and all,

well there are of course verious stages of the evolution of the Bismarck and you showed some photo that do explain some of the progression of the works on her fitting up.

I have made for Bismarck as well as for all the other main KM warships some references to associate with the time the technical modifications and the camouflages / painting that were associated with it.

YES, there are some Bismarck photos after the Baltic camouflage ( so in full technical flak and radar configuration ) after she left Norway for the last mission.

That is exactly what I was telling you and I have made a model just like that ( and I suppose most of the modelers want to make BS complete and not partilally complete during the fitting up ).

If one wants to make her without the Baltic camo ( B/W stripes ) that is the best option of course.

Here it is :

http://www.kbismarck.com/models/model61.html

and here too :

http://www.modelshipgallery.com/gallery ... index.html

are you going for this one ??

Ciao Antonio :D
User avatar
Kit-Builder
Member
Posts: 86
Joined: Sun Nov 27, 2005 12:25 pm
Location: Western Australia

Post by Kit-Builder »

Well Antonio you sure do look like the man I need to talk to about anything relating to the Bismarck, ship or kit :cool:. I like all your ships very much! You have got this history/hobby well under control and on top of that you can find the time to answer my questions too :D .
I’ll try and up-load pics of what I’ve done so far and see what you think. It’s never going to be 30% of your high standard so don’t be to hard on me :negative:.
Regards Steve
User avatar
Antonio Bonomi
Senior Member
Posts: 3799
Joined: Mon Oct 18, 2004 10:44 am
Location: Vimercate ( Milano ) - Italy

KM warship kits

Post by Antonio Bonomi »

Ciao Steve and all,

thanks for the very nice compliments :oops: :oops:

Modeling and Kriegsmarine warship history is my hobby and passion since 33 years now, Tirpitz my favourite ship.

So I am supposed to know something, ... just jocking of course :D.

I am very patient with modelers been a modeler myself, ... I know how hard it is sometimes to learn,.. I did it too.

We will never reach the level of the ' BEST ' Bismarck modeler on the world (and to me it is Herr Josef Kaiser :shock: ) but we will have fun and enjoy our hobby learning something togheter about this beautiful ship.

So do not worry, I am only ' hard ' with liers and false people, .. and usually there is not this risk with modelers :D

Ciao Antonio :D
User avatar
Kit-Builder
Member
Posts: 86
Joined: Sun Nov 27, 2005 12:25 pm
Location: Western Australia

Post by Kit-Builder »

Image
Ok, here are two photos of my very poor use of the WEM sets so far.
First shows the PE in the tubs as per WEM’s instructions (parts 18 from the decking set #3565) and how small the floor plates are if you wish to remove the 230mm scale thickness and unrealistic “tub” walls.
The unused floor plates for the flak mountings up on Tirpitz’s “B” (called Bruno too?) turret may be reducible by attaching a drill fitting and sanding them down to fit.
I found that the searchlight plates are a perfect fit for the AA rangefinder towers and I’m happy about them there.
With the parts #43 from the main Bismarck detailing set (#3529) you will find that they are even smaller so this may not be useful as Tower flooring, though it has the correct “dot” holes you can see in the wreck photos of the towers.
Image
The second photo shows my third attempt at putting the railing on the rear tower. Even a poor job like this is clearly better than the kit’s grossly out of scale walls. First time was without the floor and the second time was after I superglued it in the wrong place and as you see it now. The railing was never meant to be roughed up like that and is a little worse for ware. It’s behind the turret so hopefully that will draw the eye away from it a bit.

There are demonstrable mistakes with the WEM sets but I can only again repeat the fact that is up to you to get the most out of them. They should be called “assistance sets” so that you then know that that’s what they do best (some tank PE sets are hopeless in them selves but as additions to scratch-building they are great).

Hope that someone finds that useful :think:.
Regards Steve
User avatar
Antonio Bonomi
Senior Member
Posts: 3799
Joined: Mon Oct 18, 2004 10:44 am
Location: Vimercate ( Milano ) - Italy

Bismarck WEM set

Post by Antonio Bonomi »

Ciao Steve and all,

you are absolutely right, it is out of any of us to take the best out of the kit, and that is directly proportional to each person skill and modeling capabilities.

But you are doing very well as far as I can see on your photos :clap:

So keep on trying and patiently do the work one by one,... and at the end you will be surely a lot satysfied with your results ( even if I have to tell you that always in my modeling experiences I felt that doing the same model another time I was going to do it better, .. so again it is a learning path..).

The base model do have dimensions that sometimes are not correct, the PE producers have some options : fit the wrong dimensions of the kit, ... make it perfectly in scale but orrible to see after,... make it in between, so better looking but not perfect either ... not an easy decision to be made :think:

You have to 'adapt' the pieces to the model and make the necessary modifications.. and I see you are just doing it very well.

YES, on Tirpitz as well as every German warship the turret names were A-Anton, B-Bruno, C-Caesar and D-Dora.
It was valid also for the secondary armament ( starting from the bow to the stern reference midship) and with the indication of port or starboard side.

Keep in mind that what you are doing can be beautiful to be seen but not historically correct, so a model precision is up to the model maker.

I mean that for example the railings on the Bismarck ( very nice to be showed as they were with the brass PE parts ) on reality were covered with canvas,.. so if you want to make them historically very precise,..they will look not so beautiful,..and than that hugly plastic stuff on the model was more correct that the beautiful brass railing.

And again, on the main deck the railings were folded down, and sometimes also on the upperdecks too ( see real Prinz Eugen photos ).

We talked about the flag post's,..removed and placed into the ship somewere, .. same for the davit's.

I am sure you got the concept ... so you have to decide upfront if you prioritize the historical precision of a defined day and situation , .. or the ship general beautiful look with all parts showed.

Not an easy decision, .. :think:

Ciao Antonio :D
User avatar
Kit-Builder
Member
Posts: 86
Joined: Sun Nov 27, 2005 12:25 pm
Location: Western Australia

Post by Kit-Builder »

Thank you Antonio, for being so gentle on me :clap: :clap:.

Based on the fact that I wish to have the quad 20s up above the admiral’s bridge and an all light grey superstructure along with the railings exposed I’m going to declare this a fantasy Bismarck build. I hope you can still help me keep this as close as I can as to the original ship (looks like a Bismarck, smells like a Bismarck then it……) but with as much of the WEM set as I can use :) because it all ands to the pleasure of the hobby for me :cool:.
I’m glade you were able to tell me so fast that I was going down the wrong path because it has lifted the weight off my shoulders regarding a historical build (and if you ever want the same favor returned regarding the German WW2 Tiger 1 then I’d be only to happy to help as that topic is just as fraught with danger :lol:).


Looking at the Blohm & Voss kit plus Thomas Schmid’s 3D wreck model and pre-wreck model as well as the photo of 105mm Flak ammo hoists on the Tirpitz I decided to do a bit of “combat modelling” on the lower rear superstructure. This is a very fresh photo and Tamiya part D14 and it needs cleaning up with filler/putty before moving on with the missing lockers and other basic detailing in this area.
Indeted to you,
Steve
Image
User avatar
Antonio Bonomi
Senior Member
Posts: 3799
Joined: Mon Oct 18, 2004 10:44 am
Location: Vimercate ( Milano ) - Italy

Bismarck model

Post by Antonio Bonomi »

Ciao Steve and all,

very good,.. No, not a ' fantasy' but ' your ' Bismarck, and it must be satisfactory for you.

My model for example is just like that, not 100 % perfect, I know exactly were differences are, .. but I wanted it to be that way,.. I am ok with it and it is my Bismarck :D .

I am very glad to see your modeling capabilities on work, and I can say that you have 'clean hands' and it shows that you are used to make models,.... good, .. now I know your Bismarck will be nice at the end.

You will be surprised to know that I made all German tanks on 1/35 already, and several times,.. including the Tiger 1 the KonigTiger and the Hunting Tiger,... the Elephant,...etc etc,.. my favourite tanks are the T34 version 1942 and the Panther, .. I like also the Sturmgeschutz IV,.. the 88 mm with a 7 tons flakvierling too,.. well this bring me back to when I was making models to pay my study,.... trains, airplanes, tanks, ships,.. on the 70's,... now all of them will look orrible to me,... I was very young.

Back to warships and my real passion ( my first Tamiya Tirpitz is from 1982 ),.. before I made Revell's and Airfix's ones, .. hugly.

Here some links that you may find useful.

For any info feel free, I have dozens of photos of my models in construction that might help, .. and of course real photos too.

But those are interesting links :

http://www.bismarck3d.prv.pl/

http://modelingmadness.com/reviews/misc ... irpitz.htm

http://www.steelnavy.com/WEM350BismarckDecks.htm

http://www.fineartmodels.com/pages/prod ... ct_area=59

http://www.fineartmodels.com/pages/prod ... ct_area=79

Ciao Antonio :D
User avatar
Kit-Builder
Member
Posts: 86
Joined: Sun Nov 27, 2005 12:25 pm
Location: Western Australia

Post by Kit-Builder »

Hi all,
First is the aft hanger cleaned back ready for the big chop :shock:. Based on Stefan's 3D avi of the hanger (well worth down loading) I'm going to build new sides for the hanger.
Image
Here is one of the side boat mounts and how I held it together with "blue-tack" while I glued it together. It's ok but I'm going to build a one off jig for the other one (tried to do it easy but it could go very wrong too :negative:).
Image

Anyway the WEM parts are as good as they get, etched wise, so I know this is going well so far.
Best to you all
Steve
Post Reply